Performing an Employee PTO Register Inquiry
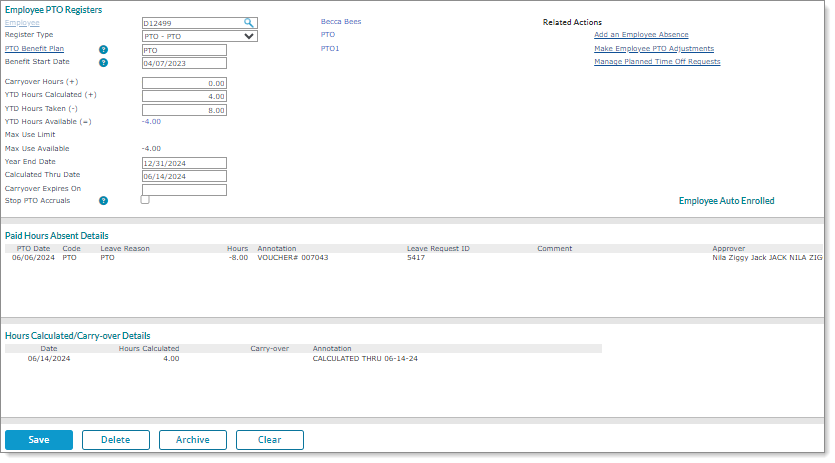
The Employee PTO Register form displays paid time off (PTO) for an employee, including the details of time accrued and taken. You can also delete or archive a PTO register for an employee using this form.
The PTO benefit plan determines how much PTO an employee will accrue, and the PTO register type determines when the employee accrues PTO. The employee’s PTO Register is where the system keeps track of the PTO. It is a record of “credit” and “debit” transactions, and shows a running balance. Each time PTO accrues, it is posted (credited) to the employee’s register; each absence is subtracted (debited) from the register. For example:
To perform an employee PTO register inquiry:
|
1.
|
Enter the Employee by either entering the name, Social Security Number, or ID to display a pop-up list of matching employee records. You can also click the field label or press Ctrl+Enter with your cursor in this field to open the search window. |
|
2.
|
Select the PTO Register Type. The drop-down lists only the plans in which the employee is currently enrolled. |
Note: If an employee is auto-enrolled in a PTO plan, "Employee Auto Enrolled" displays.
|
3.
|
Enter the PTO Benefit Plan. Existing information for this employee displays in the form. |
|
•
|
The rest of the top panel summarizes the PTO benefit plan information. |
|
•
|
The Paid Hours Absent Details panel displays each absence taken. |
|
•
|
The Hours Accrued/Carry-over Details panel displays each accrual earned by the employee. |
Note: If you change the PTO Benefit Plan during the plan year ending pay period, you may need to make adjustments.
|
4.
|
The Benefit Start Date displays the date that was selected when the employee was enrolled. The system uses this date to calculate the employee’s PTO for this plan. |
Note: If you need to change this date, you can only change it for employees enrolled in PTO with an Anniversary Year year-end basis plan in the following instances:
|
•
|
When there are no payroll-generated accruals (calculated hours). |
|
•
|
When there are manually-entered accruals (calculated hours) or any other manual adjustments in the Employee PTO Register Adjustment form, the PTO Register Adjustment Import form, or the Employee Absence form, even if the comment is identical to the format from payroll-generated accruals. For example, "CALCULATED THRU 8-14-21." |
|
•
|
When there are no manual adjustments on the employee’s register. |
Note: Currently, if the employee is in a register that has a Fiscal Year End Basis, you are allowed to update the Benefit Start Date at any time.
You can correct errors made in the PTO Benefit Plan Setup. (Originally, you had to delete the PTO register and re-enroll the employees, if they were in an Anniversary Year End Register.)
Note: If you change the Benefit Start Date during the plan year ending pay period, you may need to make manual adjustments.
When you make a change to the Benefit Start Date, the following messages display depending on the situation:
| When there are no payroll-generated accruals |
"Updating the Benefit Start Date for this employee in an Anniversary Year End Basis requires the Year End Date to be updated to <Benefit Start Date - 1>. Do you want to continue with this change?" |
| If you select Yes |
The system updates to the date you entered or selected. Also, the Year End Date immediately updates to one day before the new Benefit Start month/day. (Selecting No reverts to the original date.) |
| If an employee has payroll-generated accruals |
"The Benefit Start Date may not be amended after an accrual has been processed through payroll." |
Note the following:
|
•
|
The Benefit Start Date update displays in the audit log. However, the Year End Date change displays as Rpt Plan with the data displaying as a Unidata date. |
|
•
|
When a change to the Benefit Start Date causes an employee to move from one seniority level of accrual to another, the appropriate accrual takes place in the payroll and records to the PTO register. |
|
•
|
The existing behavior for an employee in a Fiscal Year End basis Register Type remains unchanged. |
|
5.
|
To prevent an employee from receiving any PTO accruals for this plan, select the Stop PTO Accruals field. A confirmation message displays, "Are you sure you want to stop the employee from receiving accrued PTO hours?" Click Yes to proceed. (Note: This setting does not impact the employee’s Benefit Start Date and Accrued Thru Date and the employee remains enrolled in the plan.) |
To restart an employee's PTO accruals for the plan, deselect this field. (PTO accruals for the employee immediately begin again.)
Note the following when using this setting:
|
•
|
If an employee exists in more than one PTO register, enabling this setting only applies to each register separately. |
|
•
|
When this setting is enabled, an employee in any plan or register type immediately stops accruing hours on the payroll. |
|
•
|
When the PTO accruals stop and the employee is paid under conditions that would normally cause an accrual, the employee's voucher still displays the Paid Time Off Accrued panel on the PTO tab with zero (0) hours accrued. |
Note: The Leave of Absence form and the Reactivation form also allow users to stop or resume PTO accruals for an employee by selecting or deselecting the Stop PTO Accruals field. After making that selection or deselection and if there is a leave of absence or reactivation approval policy in place, when the leave of absence or reactivation is approved that setting automatically registers here on the Employee PTO Register form in the Stop PTO Accruals field. (See Tracking Employee Leaves of Absence and Reactivating an Employee.)
|
6.
|
If you want to perform PTO adjustments for the selected employee, select one of the following shortcuts: |
|
•
|
Add an Employee Absence: Opens the Employee Absence form, where you can enter the employee's absences from work. This is time off that affects the employee’s PTO register. (See Entering Employee Absences.) |
|
•
|
Make Employee PTO Adjustments: Opens the Employee PTO Register Adjustment form to adjust the employee's number of accrued hours or carryover hours from a previous year. You can also adjust the accrued through date. (See Adjusting Accrued or Carryover Hours for Employees.) |
Note the following about these shortcuts:
|
•
|
Only the forms you can access will display as shortcut links. For example, if you do not have access to the Employee Absence form, the Add an Employee Absence shortcut will not display. If you have no access or are denied access to both forms, the header and shortcuts do not display. |
|
•
|
When you select a shortcut, the system automatically populates the selected employee in the form that opens. |
|
•
|
After you make changes or adjustments in a form and click Save, when you close that form the adjustments immediately display in the Employee PTO Register if the form is open to the same plan and register for those adjustments. |
|
7.
|
If you want to terminate a PTO register for an employee click Archive, which keeps an historical record of that register so you can refer to this information when seeking answers about what was done in the past. |
Note: You must select an Employee and Register Type to enable the Archive button.
When you click Archive a warning displays stating that any pending PTO request that have not been approved need to be manually removed using the Planned Time Off Requests form. Confirm this warning by clicking OK.
Note: Archiving a PTO register deletes the register's Audit Log, so it is no longer available.
Another warning displays stating that archiving a PTO register terminates the register for the employee, so you cannot makes updates to the enrollment after the register is archived. Click Yes to clear the fields on the form. (Clicking No returns you to the form to make updates.)
Note: After archiving a PTO register, the plan no longer displays in Employee Portal (EP) and the system no longer makes additional accruals.
The system places the archived register into an Archived folder as a read-only record. You can review the archived register's historical information, including the Benefit End Date. However, you cannot make any adjustments to the archived register. (At this time, the Save and Delete buttons are disabled.)
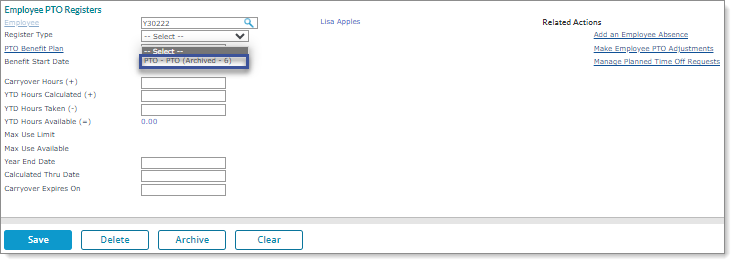
When you select the Register Type field for an archived record, the list displays "Archived" at the end of the register type. For example:
Note the following:
|
•
|
The archived record's numbering is based on the client, not the employee. Therefore, each number is unique. |
|
•
|
Archived records display at the bottom of the list beneath any active records. |
