Managing Payday Notifications
In PrismHR, you can enable payday notifications at the system and client level. When enabled, the system automatically sends payday notifications to employees set up with direct deposit, by personal email or cell phone, informing them they have received pay. This encourages employees to view their recent pay information in Employee Portal (EP). The following details:
|
•
|
Enabling payday notifications at the system and client level |
|
•
|
Electing payday notifications in EP |
|
•
|
Sending payday notifications |
|
•
|
Suppressing payday notifications for a specific payroll batch |
|
•
|
Creating a custom email notification message template |
|
•
|
Defining payday notifications daily start time |
|
•
|
Viewing notifications to be sent on the Payday Notification Queue form |
|
•
|
Viewing the Payday Notification Transmission Report |
Enabling Payday Notifications
In PrismHR, you can enable payday notifications at the system and client level. Enabling at the client level overrides the system level.
Note: Enabling payday notifications at the system level elects every employee across all clients to receive notifications. Also, be aware that payday notifications are not designed to trigger in client demo environments.
System Level
On the System Parameters form, you can enable payday notifications at the system level.
To enable payday notifications at the system level, do the following:
|
1.
|
Click  (Back Office). (Back Office). |
|
2.
|
From System|Change, select System Parameters. The System Parameters form opens. |
|
3.
|
Select Enable payday notifications. The system displays a dialog box indicating that this option enables payday notifications for all employees across all clients. You can override this setting at the client level, and employees can choose to participate in EP. |
Enabling payday notifications at the system level enables only email notifications. Employees can elect to receive SMS/Text notifications in EP.
Client Level
On the Client Details form Other tab, you can enable payday notifications at the client level. This overrides the system‑level setting.
To enable payday notifications at the client level, do the following:
|
1.
|
Click the CLIENT menu. |
|
2.
|
From Client|Change, select Client Details. The Client Details form opens. |
|
4.
|
For Payday notifications, select Enabled. The system displays a dialog box indicating that this option enables payday notifications for all employees with this client. Employees can choose to participate in EP. |
Enabling payday notifications at the client level enables only email notifications. Employees can elect to receive SMS/Text notifications in EP.
After enabling payday notifications in PrismHR, employees can manage how they receive their payday notifications on the Account Settings page in EP.
Electing Payday Notifications in Employee Portal
In EP on the Account Settings page, employees can elect and manage payday notifications.
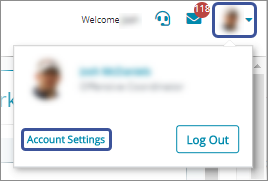
To open the Account Settings page, do the following:
|
1.
|
Click the profile icon. Select Account Settings. The Account Settings page opens. |
|
2.
|
Click the NOTIFICATIONS tab. |
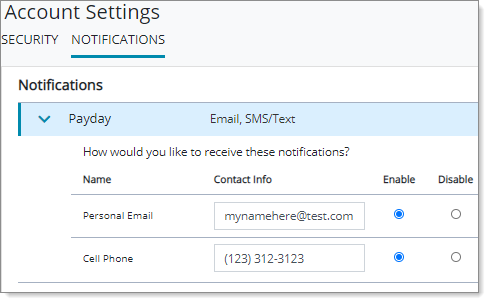
The NOTIFICATIONS tab lets employees manage whether they receive payday notifications, and how they receive them. Whether the Payday notification displays depends on the configuration in PrismHR. If settings at the system or client level restrict employees from payday notifications, the Payday notification is disabled in EP.
When enabling payday notifications at the system or client level in PrismHR, the system enables the Personal Email option in EP if the employee has a valid email address entered on the Contact Info page. The system does not enable Cell Phone by default. However, employees can enable the Cell Phone option if they have a valid cell phone number entered on the Contact Info page.
Sending Payday Notifications
The following details how the system sends payday notifications:
|
•
|
The system checks for payday notifications daily and sends at the first login or 4:15 a.m. EST— whichever occurs first. |
|
•
|
SMS/Text notifications send one per each voucher processed. |
|
•
|
Email notifications send only for regularly scheduled payroll batches. They do not send for special or manual payroll batches. |
Suppressing Payday Notifications
In PrismHR, you can suppress payday notifications for specific payroll batches from the Payroll Control form.
To suppress payday notifications for a payroll batch, do the following:
|
1.
|
Click the PAYROLL menu. |
|
2.
|
From Payroll|Change, select Payroll Control. The Payroll Control form opens. |
|
3.
|
After selecting a Payroll Number, click  (Action Menu). Select Options. The Payroll Options form opens. (Action Menu). Select Options. The Payroll Options form opens. |
|
4.
|
Enable Suppress Payday Notifications. The system suppresses all payday notifications for that payroll, and they do not show in the Payday Notification Queue. For more information, see Payday Notification Queue. After posting the payroll, the system returns to the default state for the next batch (Suppress Payday Notifications is disabled). |
|
6.
|
On the Payroll Control form, click Save. |
Using the Message Template for Payday Notifications
In PrismHR on the Email Services form, the system uses the Payday Email template type and a default template when sending the payday notification email. However, you can create a custom message template on the Message Template form. After creating a custom message template, you can apply the template to the Payday Email template type on the System Parameters form.
Note: The custom message template applies only to the email notification.
To apply the custom message template, do the following:
|
1.
|
Click (Back Office). |
|
2.
|
From System|Change, select System Parameters. The System Parameters form opens. |
|
3.
|
Click (Action Menu). Select Email Services. The Email Services form opens. |
|
4.
|
For the Payday Email template type, click Template and select the template from the list. |
In addition, you can use the following substitution variables in the message template:
|
Field
|
Substitution Variable
|
| Company Name |
<<COMPANY.NAME>>
|
| Account Suffix |
<<ACCOUNT.SUFFIX>>
|
| Payroll Pay Date |
<<PAYROLL.PAY.DATE>>
|
Note: For more information about substitution variables, see Using Substitution Variables.
Defining Payday Notifications Daily Start Time
You can specify the daily start time for payday notifications using the Payday Notify panel on the Notification Control Panel form, which is accessible from the Operations|Action menu. In addition, you can view the last date/time they were run.
To specify the daily start time for payday notifications, do the following:
|
1.
|
Click  (Back Office). (Back Office).
|
|
2.
|
From Operations|Action, select Notification Control Panel.
|
|
3.
|
In the Payday Notify panel, enter the daily start time in the Daily Payday Notification Start Time field (this field defaults to 05:00:00). Valid entries for this field are times between 12:01AM and 12:00PM (essentially, between midnight and noon), in military time. For example, to start payday notifications at 1:00AM, enter 01:00:00. |
Note: If you enter a time outside the 12:01AM and 12:00PM time-frame, an error message displays, "Payday Notification time must be between 12:01 AM and 12:00 PM."
To the right of the Daily Payday Notification Start Time field a display-only process status displays, which matches the same control number that displays in the BE Notify panel. (See the Benefits Enrollment User Guide.)
In addition, the display-only Last Run Date/Time field displays the last date and time the process ran.
Payday Notification Queue
In PrismHR, the Payday Notification Queue form lets you manage pending payday notifications based on a pay date. For more information, see Managing Pending Payday Notifications in the Payroll Administration Guide.
To open the Payday Notification Queue form, do the following:
|
1.
|
Click the CLIENT menu. |
|
2.
|
From Client|View, select Payday Notification Queue. The Payday Notification Queue form opens. |
Viewing the Payday Notification Transmission Report
In PrismHR, you can run the Payday Notification Transmission Report that lists payment notification transmission statuses. For more information, see Generating Payday Notification Transmissions in the Payroll Reports Guide.
To open the Payday Notification Transmission Report, do the following:
|
1.
|
Click  (Reports). (Reports). |
|
2.
|
From Client|Report, select Payday Notification Transmission Report. The Payday Notification Transmission Report opens. |
