Defining Employee Name and Contact Information
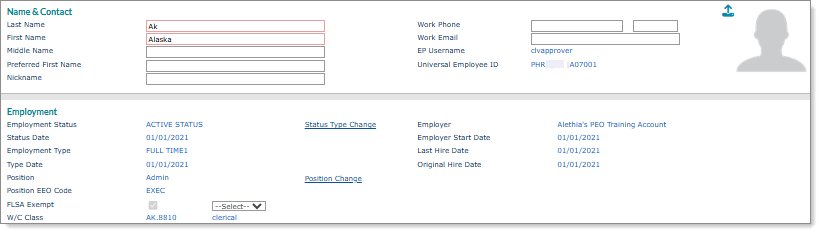
You can define employee name and contact information, as well as related read-only employment information using the Name tab on the Employee Details form. For example:
Note: Deidentified employees do not display in the Employee Search Results list when you select Employee. You can only access these employees by manually entering their user ID or name.
To define employee name and contact information:
|
1.
|
Enter the Employee by either entering the name, Social Security Number, or ID to display a pop-up list of matching employee records. You can also click the field label or press Ctrl+Enter with your cursor in this field to open the search window. The employee’s Name & Contact and Employment information display. |
Note: The First Name, Last Name, Middle Name, Preferred Name, and Work Email fields do not allow special or invalid characters.
Note the following about the Preferred Name field:
|
•
|
Use this field to enter a name that an employee prefers to use, which the system will use in place of their legal first name. |
|
•
|
The employee's preferred name displays in place of the first name in the header on all tabs in the Employee Details form. (The first name displays if you do not specify a preferred name.) |
|
•
|
The system adds updates to an employee's preferred name in the audit log for tracking purposes. |
|
•
|
The employee's preferred name displays in any payrolls that you view in the Process Payroll form and continues to display throughout the payroll process. |
|
•
|
You can initiate a Zoom call to the employee's work phone number by clicking the Call ( ) icon in the Work Phone field, if a supported soft phone exists on your computer. ) icon in the Work Phone field, if a supported soft phone exists on your computer. |
|
2.
|
Update the Name & Contact information, if needed. |
|
3.
|
View the information, such as the EP Username or the various details about their Employment, including their Universal Employee ID, which displays an employee's qualified employee ID (System ID|organization ID|employee ID) so you can help them register and set up their PrismONE Mobile application. |
Note: The FLSA Exemption Category field displays next to the FLSA Exempt field when it is enabled and the employee's position is marked as FLSA-exempt. You can apply an FLSA exemption category code by selecting an option in the FLSA Exemption Category field.
|
4.
|
The Status Type Change and Position Change fields are only available to users with correct permissions. Clicking these fields opens the following forms: |
|
•
|
Status Type Change: Opens the form where you can change the employee status, employee hours, and effective date. Once the form opens, press Tab to populate the status and date. See Performing Status Type Changes. |
|
•
|
Position Change: Opens the form where you can change the employee position and effective date. Once the form opens, press Tab to populate the position. See Changing an Employee's Position. |
|
5.
|
You can include a photo of the user: mouse over the image and then click Upload to add an image, or Delete to remove an existing image. |
|
6.
|
Click Save. If you changed the employee's Last Name, the system prompts you to confirm the change. |
Note: A save banner, "The current record has been saved," displays on the tab at the top of the form after you make an update and click Save. (The save banner disappears in a few seconds.)
Note: If the selected employee works for another company, the Works for <X> other company(s) link displays. Selecting this link displays other companies where the employee works. (After making a selection, the Employee Details form reopens to that company.)
Parent Topic
Maintaining Employee Details
