This page has moved and will no longer be updated. To access the current page, click the Online Help  icon in PrismHR or navigate to the new help docs site and search for your topic.
Processing Mass Employee Changes
Use this feature to process leave of absences, employment reactivations, rehires, status type changes, and terminations for multiple employees at once, including reassigning pending approvals assigned to terminated employees. For example, if your client employs seasonal employees whom they terminate at the end of the season, you can select the Termination option to terminate those employees in a single process. For example:
Note: This form replaces the Mass Employee Termination form.
Viewing an Employee's Status History
Before processing multiple employee changes, you can view their status to determine how that employee will be impacted by the action you are about to process.
To view the status history for an employee, do the following:
|
1.
|
Go to the Mass Employee H/R Actions form on the HR|Action menu. |
|
2.
|
Select Status Type History from the Actions menu. The Employee Status History form displays. |
|
3.
|
Select or enter the Employee ID. All status history for that employee displays. |
Performing Mass Employee Actions
After viewing the status history for the employees you want to update, you can process a leave of absence, employment reactivation, rehires, status type change, or termination for multiple employees.
To perform a mass employee action, do the following:
|
1.
|
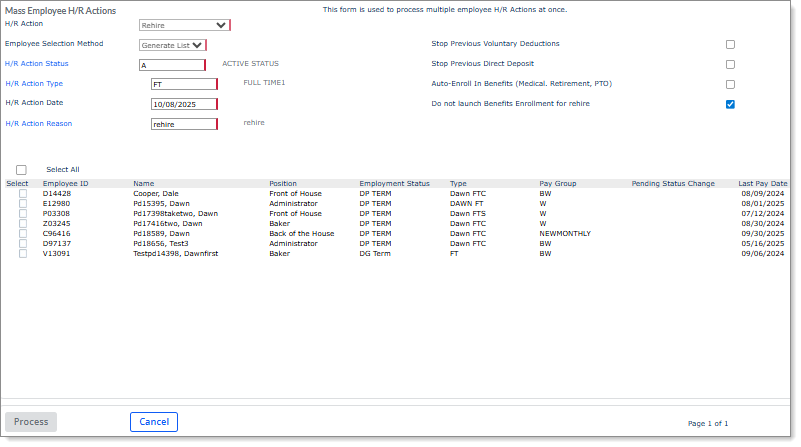
Go to the Mass Employee H/R Actions form on the HR|Action menu and select an option in the H/R Action field: |
| Leave of Absence |
Processes multiple employee leave of absences at once |
|
Reactivation
|
Reactivates multiple employees at once
|
|
Rehire
|
Processes multiple employee rehires at once
|
|
Status Type Change
|
Processes multiple employee status type changes at once
|
| Termination |
Processes multiple employee terminations at once |
Note: You cannot edit the H/R Action or Employee Selection Method after making a selection in these fields. (Click Cancel to clear the form.)
|
2.
|
Select one of the following Employee Selection Method options: |
| Generate List |
Generates a list of employees who meet the selected criteria. |
|
Import List
|
Displays the Upload Employees button, which you can select to import your list of employees who meet the selected criteria.
Note the following when working with Import List:
|
•
|
The system only accepts uploaded files as a single-column list of employee IDs in either .txt or .csv format. |
|
•
|
Employees listed in the import file who do not exist in the selected client are automatically excluded from the import. |
|
•
|
The system validates the contents of the imported employee list and if any employee does not pass validation, they are not included in the on-screen report. In addition, if "Fail" displays in the Import Status column in the report, this indicates that the employee does not match the selected criteria. (You can access this report by selecting Download Report.) |
|
•
|
If no employees pass validation a message displays, "There were no employees with selected." |
|
Note the following:
|
•
|
You must select an H/R Action and Employee Selection Method first before entering or selecting the other required fields. |
|
•
|
After selecting an option, a confirmation message states that this functionality is only available to service providers and skips any approval policies already in place. Click OK to continue. |
|
•
|
You must complete the required fields to generate a list of employees or display the Upload Employees button. |
|
3.
|
Select the H/R Action Status field and choose a status for this action from the list that displays. |
|
4.
|
For reactivations, rehires, and status type changes only, select the H/R Action Type field and choose an employee type code from the list that displays. |
|
5.
|
Enter or select a date to perform the action in the H/R Action Date field. |
|
6.
|
Select the H/R Action Reason field and choose a reason for this action from the list that displays. |
|
7.
|
A list of employees or the Upload Employees button displays, depending on the Employee Selection Method option you selected. |
Note: If you select Upload Employees, a File Upload dialog displays where you can select your employees list for import. Click Add Files and navigate to your file, then click Start Upload. After clicking Close the imported employees displays.
|
8.
|
Do the following depending on the action: |
| Leave of Absence |
Enter or select a date in the Planned Return from Leave field when the employees will return from their leave of absence. (Note that a planned return is not required.) |
|
Rehire
|
Select the following fields, depending on the rehire action:
|
•
|
Stop Previous Voluntary Deductions: Stop any voluntary deductions that were previously set up for these employees. |
|
•
|
Stop Previous Direct Deposit: Stop any direct deposits that were previously set up for these employees. |
|
•
|
Auto-Enroll in Benefits (Medical, Retirement, PTO): Auto-enrolls employees into Medical, Retirement, or PTO plans that have auto-enroll rules configured at the client level. With rehires, this option only works if these employees do not have an existing Benefit/PTO record. |
|
•
|
Do not launch Benefits Enrollment for rehire: Does not launch Benefits Enrollment for these employees. |
|
|
Status Type Change
|
Use the optional filter for Status and Type to narrow the Find Employees results.
|
| Termination |
Do the following:
|
•
|
Enter or select Filter by Last Paid Date to filter all employees who have not been paid since this date. |
|
•
|
Select Enroll employees with COBRA-electable benefits in COBRA if these employees need to enroll in this plan. |
|
•
|
In the Okay to Rehire field, select Yes if these employees are eligible for rehire in the future. |
|
•
|
Select If ACH, Turn off ACH? if you do not want these employees to receive further ACH transactions. The system sets the employees' ACH status to Inactive. |
|
•
|
Enter or select the Last Day Worked for these employees. |
|
|
9.
|
To perform this action for all employees, click Select All. Otherwise, select each employee as a recipient of this action. |
|
10.
|
Click Process to perform the action. A confirmation box displays. Click Yes to continue. |
|
11.
|
A message displays in the form confirming the action is complete. |
Reassigning Pending Approvals for Terminated Employees
During the termination process, the system detects if any employees being terminated have pending approvals. If the terminated employees do have pending approvals a prompt displays after the termination is complete, "There are pending approvals assigned to terminated employees. Do you want to reassign the pending approvals to other client users?"
To reassign pending approvals for terminated employees, do the following:
|
2.
|
The Manage Pending Approvals form displays, where you can reassign pending approvals to other users. |
Note: For more information, see Managing Pending Approvals.
