Creating Alerts
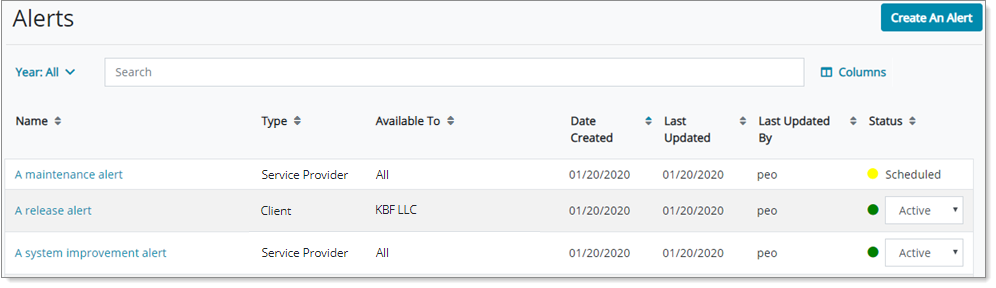
To create and manage alerts that employees see when they log in, use the Alerts form. Some examples of alerts include a dialog box announcing site maintenance, information about an upcoming release, or an expected delay in pay. You can also track alert activity (for example, the date and time the alert displayed, the number of views, and whether the alert was closed or acknowledged).
| Field | Description | |||||||||
|---|---|---|---|---|---|---|---|---|---|---|
|
Name |
The name of the alert. |
|||||||||
|
Type |
The alert target.
|
|||||||||
|
Available To |
The client or clients who can view the alert. Displays the name of the client or All. |
|||||||||
|
Date Created |
The date the alert was created. |
|||||||||
|
Last Updated |
The date the alert was last updated. |
|||||||||
|
Last Updated By |
The name of the last person to update the alert. |
|||||||||
|
Status |
The alert status:
|
Before You Begin
For an active alert to display when logging into Employee Portal (EP), you must target a segment. Use the Segments form to create a segment. For more information, see See Creating Segments.
Creating an Alert
To create an alert:
| 1. | Click the Alert tab. The Alerts tab opens. |
| 2. | Click +Add. |
Configuring General Settings
To configure general settings, use the General tab.
To configure general settings:
On the General tab, complete the following:
| Use this option | To do this | |||||||||
|---|---|---|---|---|---|---|---|---|---|---|
|
Status |
Select an alert status:
If you do not select an end date, the alert remains active. You can change the Status to Inactive to hide the alert upon login.
If you do not select an end date, the alert remains active after the start date. You can change the Status to Inactive to hide the alert upon login. If you change the Status from Scheduled to Active, you can select an end date. Note: Active alerts show for all employees. To show the alert to specific companies and employees, create and assign a segment. |
|||||||||
|
Alert Name |
Enter a name for the alert. |
|||||||||
|
Alert Features |
To display documents for employees to review and sign, enable Documents. The Documents tab displays. For more information, see Creating Alerts with Attached Documents. |
|||||||||
|
Display Behavior |
Select the display behavior of the alert:
|
At any point setting up an alert, you can
| • | Click Create an Alert to save the alert. |
| • | Click Preview to preview the alert. |
| • | Click Cancel to cancel. |
Configuring Content
To configure content shown in the alert, use the Content tab.
To configure content:
| 1. | Select the Content tab. |
| 2. | In the Header panel, complete the following: |
| Field | Enter |
|---|---|
| Icon |
An icon to display on the alert. |
| Header Title | A title for the alert. |
| Icon and Text Color | A hexadecimal value for the icon and text color. |
| 3. | In the Body panel, enter text in Body Content to show in the body of the alert. |
| 4. | In the Acknowledgment Button panel, enter a name in Button Name for the acknowledgment button. |
| 5. | In the Footer panel, enter text in Footer Content to show in the footer of the alert. |
| 6. | Click Save. |
Attaching Documents
Note: The Documents tab displays only if the Documents alert feature is enabled on the General tab. For more information, see Creating Alerts with Attached Documents.
To attach documents to an alert, use the Documents tab. You can also:
| • | Select for the alert to display electronic consent |
| • | Edit the header, body, and acknowledgment button |
| • | Select if the document requires a signature |
Note: To attach a document that requires a signature, the file must be in .pdf format. In addition, the document cannot be password protected against editing.
Targeting Segments
Targeting segments enables you to control who sees the alert upon login. To target the alert at a segment, use the Segment tab.
To target segments:
| 1. | Select the Segment tab. |
| 2. | Select segments from the list. |
| 3. | Click Save. |
You can also edit a segment from the Segment tab. To edit a segment, click Edit.
Viewing Alert Activity
To view alert activity, such as the alert status, the date and time the alert displayed, and the number of views, use the Activity tab. Some of the following options are specific to alerts with attached documents.
|
Field |
Description |
|||||||||||||||
|---|---|---|---|---|---|---|---|---|---|---|---|---|---|---|---|---|
| Company Name | The company name. | |||||||||||||||
| Employee Name | The employee name. | |||||||||||||||
| User Type |
The type of user viewing the alert:
|
|||||||||||||||
| Number of Views |
The total number of views. You click the value to open the Activity View Details window. For more information, see See Viewing the Activity View Details. |
|||||||||||||||
|
Documents Signed |
The number of documents signed out of the total number of documents. Applies only to alerts with attached documents. You click the value to open the Activity View Details window. For more information, see See Viewing the Activity View Details. |
|||||||||||||||
| Status |
The list of statuses:
|
|||||||||||||||
| Date | The date and time for each status. |
Viewing the Activity View Details
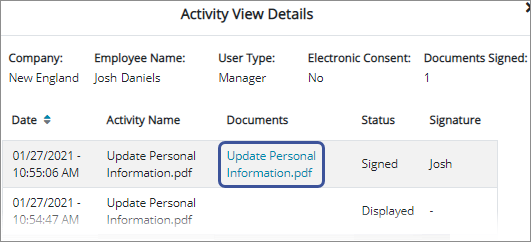
To view the alert status, date, and time signatures for a specific employee, use the Activity View Details window.
To open the Activity View Details window for alerts without attached documents:
| • | Click the value in Number of Views. The Activity View Details window opens. |
To open the Activity View Details window for alerts with attached documents:
| • | Click the value in Documents Signed. The Activity View Details window opens. |
| 1. | Click the value in Documents Signed. The Activity View Details window opens. |
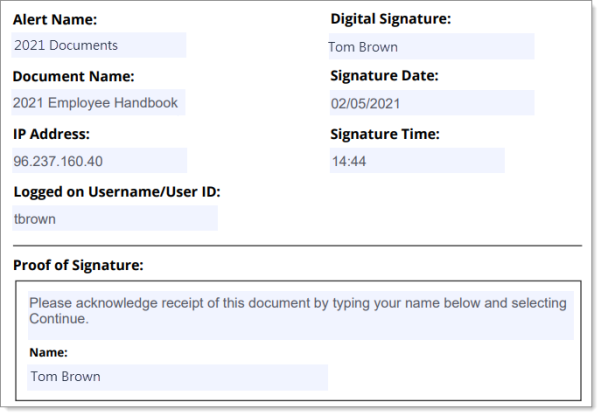
| 2. | After the employee signs the document, the Documents column displays the PDF file as a link. Clicking the link initiates a download to your machine. Click the link to download and view the signed document. |
The following is an example of the information included with the signed document: