Setting Up Pay Import Definitions
Use the Pay Import Definition form to set up pay data import definitions from tab-delimited, comma-delimited (CSV), or fixed-length data import files.
Note: After you create a pay import definition, you assign it to the appropriate client(s) in the Time Sheet tab of the Client Details form.
Defining Time Sheet Pay Import Definition Parameters
Define the parameters required to import the pay data from the file in the Time Sheet Pay Import Definition panel.
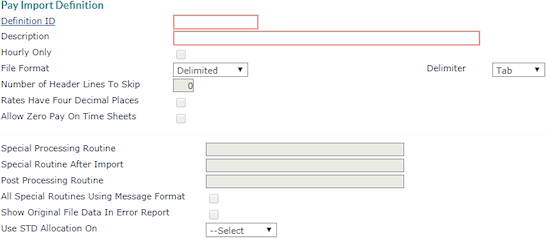
To set up pay data import definitions:
|
1.
|
Enter the Definition ID for the pay import. |
|
•
|
If you are creating a new import definition, use something descriptive, such as the name of the client that generates the data import file; the ID cannot include spaces. Also enter a short Description in the second field. |
|
•
|
You can copy an existing definition to use as the basis for a new definition. Open the Actions menu and select Copy. |
Note: You can only create and save a New Definition ID using the following characters: numbers zero through nine, lowercase letters a through z, and capitalized letters A through Z. Otherwise, an error message displays.
|
2.
|
Select Hourly Only to load only hourly employees from the import file. The system reports any salaried employees included in the file as download exceptions. |
|
3.
|
In the File Format field, select a format for the data import: |
|
•
|
Delimited—data is separated by a demiliter |
|
•
|
Fixed‑Length—data is grouped together without spaces |
If you select Delimited, select a delimiter from the Delimiter drop‑down:
|
•
|
Comma—comma (,) between data |
|
•
|
Pipe—pipe (|) between data
|
|
4.
|
If necessary, enter the Number of Header Lines To Skip. This setting skips any header content lines in the import file, and begins the import after that. For example, if the first line in the file has the column headings, and the second line is the first record, enter 1. |
|
5.
|
Select Rates Have Four Decimal Places if the pay rates have four decimal places. |
|
6.
|
Select Allow Zero Pay On Time Sheets to pass zero amounts to the time sheet. |
WARNING: Do not use the Special Processing Routine fields unless directed to do so by the PrismHR Customer Support Team.
|
7.
|
Enter the Special Processing Routine to use to convert the import file. |
|
8.
|
Enter the Special Routine after Import for the system to execute immediately after importing the file from DOS; this can reformat the file. |
|
9.
|
Enter the Post Processing Routine to execute at the end of the import process. |
Note: You must select All Special Routines Using Message Format if this is a web-based import. If this parameter is not selected, do not select it unless directed to do so by the PrismHR Customer Support Team.
|
10.
|
Select All Special Routines Using Message Format if the system uses a routine to pass back status and message information. |
|
11.
|
Select Show Original File Data in Error Report if the error report should show the complete line of data from the original file. |
|
12.
|
From the Use STD Allocation On drop-down, select the standard allocation to use for time. |
Indicating Outcome of Existing Data After Data Import
Use the When Posting Imported Data to Time Sheets panel to indicate what happens to any existing data after a data import.

|
13.
|
From the Clear Existing Pay From Time Sheets for drop-down, select how to manage existing information: |
|
•
|
All Employees: Clears all pay information for all employees in a batch when the file imports. |
|
•
|
Employees in Import File Only: Employee data in the import file overwrites any existing data only for those employees. If other employee data exists in the payroll batch, their data is preserved. |
|
•
|
None: No data is cleared. |
Note: If you chose to clear existing pay (All Employees or Employees in Import File Only), you can only select Overwrite existing amounts from the Update existing pay on time sheets drop-down. If you chose not to clear existing data (None), then you can choose a method for how to handle existing pay.
|
14.
|
From the Update existing pay on time sheets drop-down, select whether the imported data overwrites any existing pay data or adds to it. |
|
15.
|
Select Auto Add Option (when employee is in file import but not on payroll) to have the system automatically add active employee time sheets. |
|
•
|
Auto Add Active Employees to Payroll: The system automatically adds the time sheets for all active employees. There are some instances where employees will not be added: |
|
•
|
The employee’s onboarding is still in progress. |
|
•
|
It is a regular or special batch and the employee’s pay group is not included. |
|
•
|
Auto Add All Employees to Payroll: The system automatically adds all employees to the time sheet. This affects employees who were terminated and re-hired. They need to be paid but have not yet been re-hired in the system. They must also be assigned to the pay group in the import. |
|
•
|
Do Not Auto Add: The system will not automatically add active employees. |
|
16.
|
Select Recalculate Overtime Pay Rate to have the system recalculate overtime pay rates (based on the rate multiplier) on imported overtime hours that use the definition. |
For example, an employee is included in the import with a pay rate of $10. If this option is not selected, then the employee will be paid $10. If this option is selected, then the employee will be paid at the overtime rate (such as $15 for a 1.5 multiplier).
Note: If you enable Recalculate Overtime Pay Rate, make sure the import file has a pay rate for the corresponding overtime pay code. Otherwise, an error message displays, "Recalculate Overtime Pay Rate is checked for Import Definition <import definition name> but the overtime Pay Code does not have a corresponding Pay Rate on line <letter> which will result in an incorrect pay calculation."
Defining Standard Pay Imports
There are two methods for defining the pay import:
|
•
|
Mapping Data Import File: Import the pay data that has been prepared to match the client's existing time sheet column headings in PrismHR. |
Mapping Data Import File Fields
Use the Import Field Definitions table to map the fields of the data import file to those in PrismHR.

To map the data import file fields:
|
1.
|
Specify the fields in the file: |
|
•
|
If the import file is tab- or comma-delimited, enter the Field #. |
|
•
|
If the import file is fixed-length, enter the Start and End positions. |
|
2.
|
Select the Field Name of the field into which the data imports. The system skips any missing fields or applies a default value. |
|
3.
|
Use the Conversion Mask field only with direction from the PrismHR Customer Support Team. The system uses this value when data in the import file is in a non-native format. |
Mapping Data Import File
Use the Import Translation Table to map the data import file codes to those in PrismHR.

To map the data import file codes:
|
1.
|
Enter the Foreign Code from the other system. |
|
2.
|
Enter the Prism Code to use once the data imports, for example, REG. |
|
3.
|
Select the PTO Type Flag if this code is for Vacation, Sick, or Other paid time off. |
Table 70: Import Translation Codes
| Translation Code |
Description |
| V* |
Division |
| D* |
Department |
| J* |
Position Code |
| S* |
Shift Code |
| C* |
Project/Cost Center |
| L* |
Location Code |
Note: For more information about setting pay codes, see the Importing More Than 20 Pay Codes Using Match Pay Import Method article in the Customer Resource Center.
Viewing Assigned Clients for Pay Import Definitions
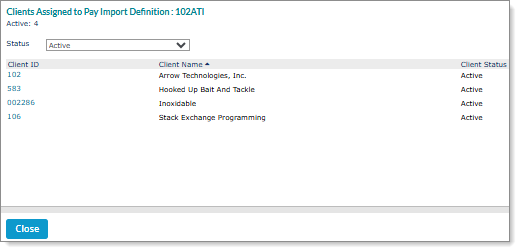
Select Clients Assign To on the Actions menu to view the assigned clients for the selected pay import definition. The Clients Assigned To Pay Imports Definition form displays. For example:
Note: If you do not select a Definition ID in the Pay Import Definition form and then select the Clients Assigned To option an error message displays, "You must enter a Definition ID first." Click OK to continue.
The Clients Assigned to Pay Import Definition form displays all active, pending, inactive, terminated, and client-canceling clients assigned to the selected pay import definition ID.
Note: You can filter the client list by selecting an option from the Status field.
Related Topics
Time Sheet Import Issues
Performing Standard Pay Imports
Client Details Setting Client Time Sheet Parameters
