Viewing Employees
You can filter both the charts and the data tables by using the drop-down menus in the At a Glance panel, or by selecting the series bars in the chart. For example, to filter out an attribute in the chart, such as a particular location when the Location option is selected in the secondary drop-down menu, select that item in the legend.
Filtering Using Menu Selections
When you select Employees in the primary drop-down menu, the following options display in the secondary drop-down menu:
Select one of the following options from the secondary drop-down menu to further filter the results:
| Option | Description |
|---|---|
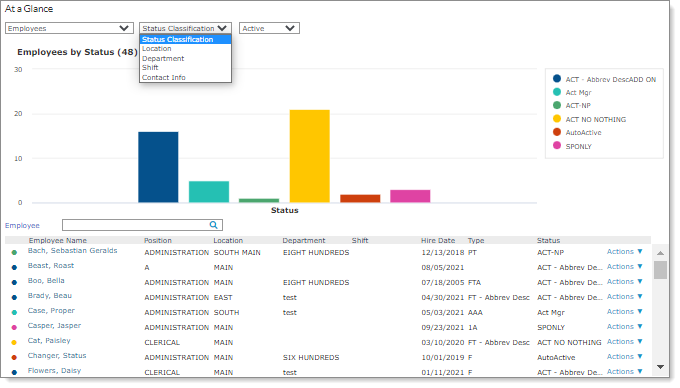
| Status Classification (previously displayed as Status) | Displays a chart and data table for employees by a status within a status classification that you can filter by clicking on a series bar in the chart. When you select the Status Classification option, a third menu automatically displays the Active (default), On Leave, and Terminated options to further filter the information. Selecting a third status classification refreshes the chart and table to display employees with the statuses within that class. |
| Location |
Displays a chart and data table for employees by location. When you select Location, Department, or Shift, a third menu automatically displays a list of available options to filter the list further (default is All). Selecting a third option filters the data that already displays in the table. Note: Only employees that are in an Active status classification are included in the chart and table data for the Location, Department, and Shift options. In addition, any prior Status Classification selection (using the third drop-down menu) or filtering (using the chart) does not affect the data for Location, Department, and Shift. |
| Department | Displays a chart and data table for employees by department. |
| Shift | Displays a chart and data table for employees by shift. |
| Contact Info | Displays a data table that lists employee contact information, including their name, position, work phone, extension, cell phone, and work email address. This table includes the employee's functional cell phone and work email links. For example, if you click the employee's work email address, a separate window displays where you can launch the appropriate application to email that employee. |
Note: Each time you make a selection in the secondary drop-down menu, the chart refreshes and a header pertaining to that selection displays above the chart, which lists the number of employees that apply to the selection. For example, if you select Status Classification and Active and the employees that meet that criteria numbers 48, the header displays "Employees by Status (48)."
Click the Client or Company in the header area to search for a different client company.
If the entire list of employees does not fit within the panel, you can click View all employees to display a scroll bar for navigating through the list. If you click the link to an employee, the Employee Details page opens.
When navigating through this list:
| • | If your client has 1000 or less employee records, after you click View all employees in the Employees list, a scroll bar displays so you can easily scroll up or down to the employee you want to review. |
| • | If your client has more than 1001 or more employee records, after you click View all employees in the Employees list, pagination controls display so you can easily paginate to the next or previous page. |
Note: These pagination controls continue to display for an employee status of 1000 or less, if you first page through using these controls for 1001 or more employees. However, if you don't use the pagination controls, a scroll bar displays for an employee status of 1000 or less instead of pagination controls.
Using the Employee Search Box
You can use the Employee search box to search for an employee using any part of the employee name. For example, a search for "smith" might display "Franklin-Smith, Diane."

After entering part of an employee name and pressing Enter, the data table re-displays all employees who match that criteria.
Note: If you clear the search term and press Enter, the table results revert to displaying all employees, which is the default.
Performing Other Functions
In addition, you can perform the following functions in the Employees data table:
| • | Select an employee's name to display that employee's information in the Employee Details form. You can update details for the selected employee in this form. (Note: If your access to the Employee Details form is set to Deny, this feature is not available.) |
| • | Use the options on the Actions menu to do the following: |
| Option | Description | |||||||||
|---|---|---|---|---|---|---|---|---|---|---|
| Employee Termination |
Select the Employee Termination option to access the Employee Termination form. The system pre-fills the employee's ID in the form, so you can terminate that employee. After making the update, click Save to return to the Enhanced Dashboard. (Clicking Clear removes the selected employee's information, so you can terminate a different employee.) Note the following when using this option:
|
|||||||||
| Pay Rate Change | Select the Pay Rate Change option to access the Pay Rate Change form. The system pre-fills the employee's ID in the form, so you can set a new pay rate for that employee. (Note: If your access to the Pay Rate Change form is set to Deny and you select the Actions menu, the system displays the following message, "No actions available. Contact your administrator.") | |||||||||
| Position Change |
Select the Position Change option to access the Position Change form. The system pre-fills the employee's ID in the form, so you can change the position for that employee. After making the update, click Save to return to the Enhanced Dashboard. (Clicking Cancel removes the selected employee's information, so you can change the position for a different employee.) Note the following when using this option:
|
|||||||||
| Status Type Change |
Select the Status Type Change option to access the Status Type Change form. The system pre-fills the employee's ID in the form, so you can change the status type for that employee. After making the update, click Save to return to the Enhanced Dashboard. (Clicking Cancel removes the selected employee's information, so you can change the position for a different employee.) Note the following when using this option:
|
