Using ACH Originators
An ACH originator is a financial institution to which a client sends ACH files. The financial institution becomes the "originating DFI" by submitting the transactions to the ACH network. If you process ACH transactions for clients, each client can have a different financial institution. Use the ACH Originators form to maintain records for each institution.
Maintaining Financial Institution Information
Use the ACH Originators panel to maintain the financial institution information.
To maintain financial institution information, do the following:
| 1. | Go to the ACH Originators form on the System|Change menu. |
| 2. | Complete the following fields in the ACH Originators panel: |
| Field | Description |
|---|---|
| Processor ID | Enter a Processor ID for the financial institution. The PrismHR Customer Support Team recommends that you use easy-to-remember abbreviations for the processor IDs. |
|
Processing Bank ID |
Enter the Processing Bank ID, which is the bank-assigned number that identifies your service bank as the destination of the ACH input files. In line 101, it occupies 10 characters, beginning at position 4. |
|
Processing Bank Name |
Enter the Processing Bank Name that processes the ACH file on behalf of your organization. This is the originating depository financial institution (ODFI). |
|
Processing Company ID |
Enter the Processing Company ID of the originating company that sends ACH files to the bank. Typically, this is the taxpayer ID of the entity sending the files to the bank. |
|
Processing Company Name |
Enter the Processing Company Name of the organization that sends ACH files to the originating bank. Typically, this is the employer's name. |
| Customer Data Sender ID | Enter the Customer Data Sender ID. |
| Reference Code |
Enter an optional Reference Code that describes the input file for internal accounting purposes. The system uses this in positions 87 through 94 of the file header record. Note: If the Trace Number Prefix field is left blank, PrismHR uses the first eight (8) digits of the originating bank’s ID. |
| Trace Number Prefix | Enter the Trace Number Prefix, which is the first eight characters of the trace number entered in positions 80 through 94 of the entry detail record. If this field is blank, the system uses the first eight digits of the originating bank ID. |
| ACH File Options | Select the ACH File Options to use. |
| Insert End-of-Transmission Character | Select Insert End-of-Transmission Character to include the end-of-transmission character at the end of the ACH deposit file. |
|
End-of-Transmission ASCII Character |
If you have chosen to insert an end-of-transmission character, select the End-of-Transmission ASCII Character to use. |
Note: The Local Download Path Name and PC File Name fields are used only by the legacy ACH process. You do not need to complete those fields when you use the PrismHR ACH features. When users process consolidated ACH files, they will name the file and choose the location on their system where they want to save it.
| 3. | If your organization uses non-consolidated ACH processing, enter the full path to the directory in the Local Download Path Name field, including the forward slash (/) character at the end. The system downloads ACH files built for this checking account to this location on your local machine. |
| 4. | Your organization can use a bank script to transfer ACH files to the financial institution that requires the use of a certain file name. Enter the NACHA Directory Override File Name to use instead of the standard file name when writing ACH files to the NACHA directory on a Windows 2000 operating system. |
If you enter an override file name here, the system always uses that file name when writing to the NACHA directory. Users will overwrite files with the same name.
| 5. | To override the ACH naming convention enter the base name of the files transferred to your PC in the PC File Name field, where the first character must be alpha. (The date and ".txt" extension are included in the downloaded filename.) For example, using PHOTO1 as the base name could display the downloaded filename as PHOTO120200101.txt. |
| 6. | If your organization uses non-consolidated ACH processing, enter the PC File Name, which is the base name of files transferred to your hard drive. The system appends the date and .txt extension to the file name in this field. The first character must be a letter of the alphabet. |
| 7. | Indicate the format used for the Child Support EFT Addenda Format. The default is Fixed and you can choose to set it to Variable. |
| 8. | Enter the number of business Days Into Future for ACH Selection. The system selects ACH transactions to submit to the ACH originator. This overrides the global setting in System Parameters; if you enter a negative number, the system holds the ACH until after its expected due date, which you can use to hold garnishments. |
| 9. | Select Separate Child Support Batches by Company to separate child support batches by client. |
| 10. | Select Separate ACH Batches For Debits/Credits to create separate payroll ACH batches within the file for credit and debit transactions. This applies only when you are separating child support batches by company. |
| 11. | If you use Cachet or Wells Fargo, or want to process a Reverse Wire Transfer for ACH processing, select the appropriate Third Party Format. |
Note the following:
| • | If you select Cachet or Wells Fargo, a panel displays at the bottom of the form (see the following sections for the relevant information). |
| • | If you select Reverse Wire Transfer, the following warning displays: |
![]()
Click OK to continue, then perform the tasks listed in the warning (see the "Setting Up Reverse Wire Transfer Format" section, below).
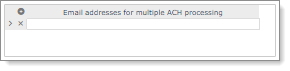
Setting Up Multiple Email Addresses
When processing multiple ACH files, you must configure the email addresses in the Email addresses for multiple ACH processing section. For example:
After processing the files, the system distributes two emails:
| • | User who ran the ACH process: This email confirms that the process successfully finished (includes all the batches in one email). |
| • | Users configured on the ACH Originators form: This email is distributed once each batch finishes and includes the file name, total credits, total debits, and total number of entries. |
Note: If you do not configure any email addresses, the system does not send an email.
Entering the File Header/Footer
If required, enter the header and footer records unique to the ACH originator, if required. The system appends these to the start and end of each file, respectively.

| 12. | Enter the ACH File Header Record for each line in the file header. |
| 13. | Enter the ACH File Footer Record for each line in the file footer. |
Setting Up Cachet Third Party Format
If you selected Cachet for the Third Party Format, complete the fields in the Cachet panel.
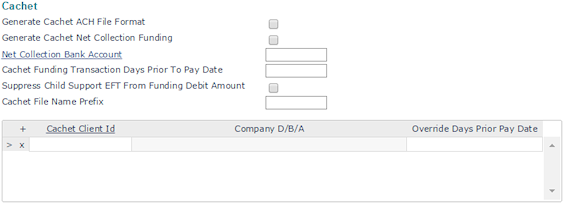
Complete the following information:
| 1. | Select Generate Cachet ACH File Format to generate a separate direct deposit funding transaction for Cachet. |
Note: Cachet prefers the net collection method, so typically you would select this option. If needed, contact the PrismHR Customer Support Team to verify.
| 2. | Select Generate Cachet Net Collection Funding to use the net collection funding method. |
| 3. | Enter the Net Collection Bank Account to which to post net fund debits. The offset account on this bank account should be the one to which to credit funds. |
| 4. | Enter the number of days prior to any pay date that a funding transaction should take place in the Cachet Funding Transaction Days Prior to Pay Date field. |
| 5. | Select Suppress Child Support EFT from Funding Debit Amount if your organization does not use Cachet to process child support transactions. |
| 6. | Enter the Cachet File Name Prefix for the transaction file sent to Cachet. |
| 7. | To override the days prior to pay date for one or more clients: |
| a. | Enter the client ID that makes the ACH transaction in the Cachet Client ID field. The client’s doing-business-as name displays. |
| b. | Enter the number of days for the client in the Override Days Prior Pay Date field. |
Setting Up Wells Fargo Third Party Format
If you selected Wells Fargo for the Third Party Format, complete the fields in the Wells Fargo panel.

Complete the following information:
| 1. | Enter the Wells Fargo Control No assigned by Wells Fargo Bank. |
| 2. | Enter the CEO Company ID assigned by Wells Fargo Bank. |
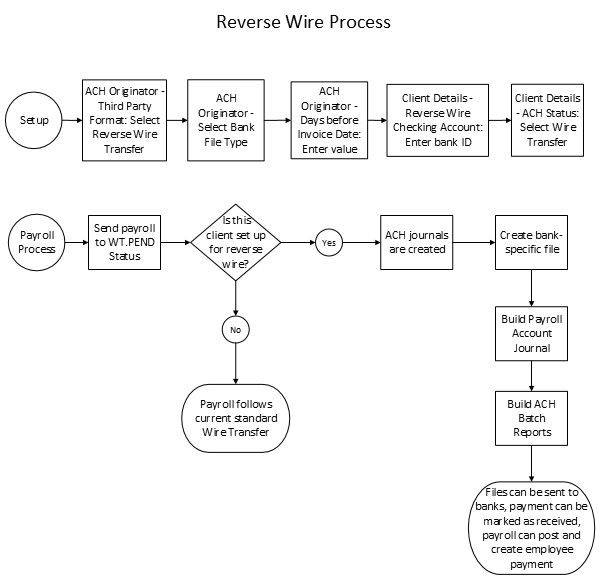
Setting Up Reverse Wire Transfer Format
Performing a reverse wire transfer allows clients to determine the payment amount prior to posting payrolls, so the system places those funds into a file that is sent before payroll is completed/posted. (This ensures that the client has the funds before payroll is posted.)
Important! The reverse wire process does not work for internal processing. (System validation on the Reverse Wire Account field on the Account tab in the Client Details form will not allow users to make an entry in this field if the active client is set up for internal ACH processing on the System Parameters form.)
Note: You cannot make changes to a reverse wire payroll whose payment has been marked as received because the funds were already sent. (These payrolls display with green checkmarks, marking them as locked Payment Received payrolls when viewing them in the SuperBatch and Process Payroll forms.)
The following diagram displays the reverse wire transfer process:
To set up a reverse wire transfer:
| 1. | Set up an ACH originator to use Reverse Wire Transfer by selecting the desired format in the Third Party Format panel on the ACH Originators form. For example: |
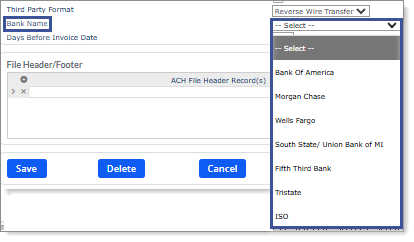
Important! You must test the ISO file format with your banking institutions before processing a live file. Not all banks may accept this format, so you must complete testing before payroll runs using the ISO format.
| 2. | Enter the number of Days Before Invoice Date, which is the offset days used to calculate the effective date for a transaction. For example, if you enter -1 and then the effective date, the system sets the offset days to one day before the invoice date. |
Note the following:
| • | If you select Wells Fargo in the Bank Name field, enter the sender’s name and address in the fields that display. |
| • | Once an originator is defined as reverse wire, it cannot be used for employee direct deposits because the ACH output file format is different. |
| 3. | Associate a bank Account ID in the Bank Accounts form with the ACH originator from the previous steps. For example: |
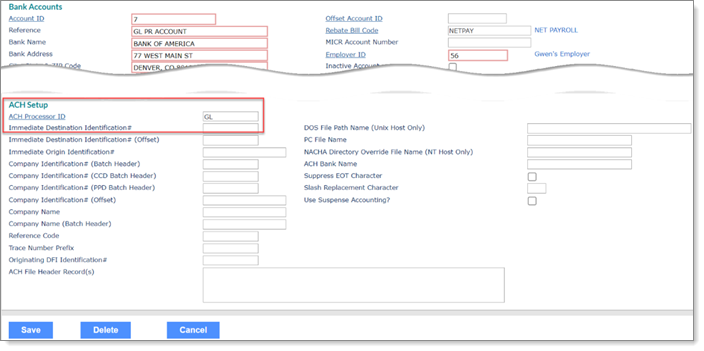
Note: Do not use a checking account the system uses to process employee direct deposits.
| 4. | Set up the client for reverse wire by setting the ACH status to Wire Transfer Client on the Billing tab in the Client Details form. (You must include the client bank account information.) For example: |
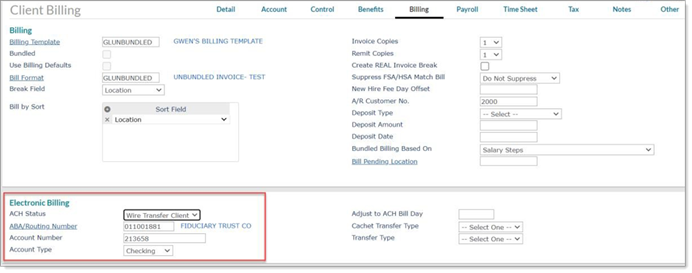
Note: Selecting the Transfer Type helps easily identify which funding is set up for the client. (This step is not required to produce a successful file.)
| 5. | On the client, associate the bank Account ID from the previous step with the Reverse Wire Account field on the Account tab in the Client Details form. For example: |

