Creating Time Off Accrual Schedules
Use the Time Off Accrual Schedules form to create or update a Time Off accrual schedule. Time Off accrual schedules track the usable hours of Time Off that employees accrue over the course of the year. The events trigger Time Off accrual, and the strict definition of "year," are defined on this form.
Note: The Time Off accrual schedule indicates when employees accrue paid time off. The Time Off Plan indicates how much paid time off employees accrue.
To create a Time Off accrual schedule:
| 1. | Click the Client menu. |
| 2. | From Client|Change, select Time Off Accrual Schedules. The Time Off Accrual Schedules form opens. |
| 3. | Complete the following: |
| Field | Description | ||||||||||||||||||||||||||||||||||||||||||||||||
|---|---|---|---|---|---|---|---|---|---|---|---|---|---|---|---|---|---|---|---|---|---|---|---|---|---|---|---|---|---|---|---|---|---|---|---|---|---|---|---|---|---|---|---|---|---|---|---|---|---|
| Schedule Code |
Enter a unique Schedule Code for this accrual. For example, V for vacation, S for sick, or P for personal time. (Required.) Note: For new Time Off Accrual Schedules, the Paid Absence option is enabled by default. |
||||||||||||||||||||||||||||||||||||||||||||||||
| Description | Enter an accrual description. (Required.) | ||||||||||||||||||||||||||||||||||||||||||||||||
| Time Off Type Code |
Enter the Time Off Type Code that restricts the number of accrual schedules that can be assigned to an employee. (Required.) Paid absence benefits are typically provided on a yearly basis. The year-to-date period for tracking benefits is based on the anniversary of each employee’s hire date or some fiscal year basis. If you use anniversaries, the employee year ending dates will vary. If you use a fiscal year end basis, all employee accruals end on the same day. |
||||||||||||||||||||||||||||||||||||||||||||||||
| Plan Year Based On |
Select the Plan Year Based On that this accrual tracks. (Required.)
|
||||||||||||||||||||||||||||||||||||||||||||||||
| Last Day of Fiscal Year |
If the Plan Year Based On is Fiscal, enter the Last Day of Fiscal Year when each fiscal year ends. Note: The Accrual Frequency and On date fields work together to determine when an accrual occurs and through which date the accrual calculates. |
||||||||||||||||||||||||||||||||||||||||||||||||
| Accrual Frequency |
Select the accrual calculation that triggers during payroll processing. (Required.)
Note: A warning message displays when you select End of Quarter, "Warning: Flat amount is the only Plan Calculation supported by End Of Quarter Accrual Frequency. The Plan Year Based On must also be Fiscal Year ending on 6/30." Click OK to continue.
Note the following:
Note: This option is available only when you set the Plan Year Based On to Anniversary. |
||||||||||||||||||||||||||||||||||||||||||||||||
| On |
Select the date type through which the accrual calculation is triggered. The options vary based on the selected Accrual Frequency. |
||||||||||||||||||||||||||||||||||||||||||||||||
|
Print on Pay Stub |
Select if balances for this accrual schedule should print on employees’ payroll check stubs. |
||||||||||||||||||||||||||||||||||||||||||||||||
|
Description for Pay Stub |
Enter a name to describe the Time Off accrual schedule. This will appear on each employee’s payroll check stub and certain reports. |
||||||||||||||||||||||||||||||||||||||||||||||||
|
Inactive Register |
Select if this accrual schedule is no longer used. The system will not calculate accruals or update existing employee accruals. |
||||||||||||||||||||||||||||||||||||||||||||||||
|
Paid Absence |
Select to indicate that this Time Off accrual is for tracking paid absences. (This option is for informational purposes only.) |
||||||||||||||||||||||||||||||||||||||||||||||||
|
Auto-enroll Thru Date is Day Before Start Date |
Select to force the accrued through date to be the day before the start date when auto-enrolling employees in plans for this accrual schedule. This can help to ensure that auto-enrolled employees do not lose accrual for that day. |
||||||||||||||||||||||||||||||||||||||||||||||||
|
Payroll Warning if More Hours Used Than Available |
Select to display a warning during payroll initialization if an employee uses more hours than currently available. |
| 4. | Click Save. |
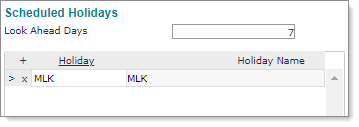
Scheduling Holidays
This setting displays if you set the accrual schedule Accrual Frequency to Holiday (see above). Use the Scheduled Holidays panel to ensure that the Time Off accrual accrues holiday-based Time Off at the appropriate time (determined by a "look ahead" period).
To schedule a holiday:
| 1. | Click the Client menu. |
| 2. | From Client|Change, select Time Off Accrual Schedules. |
| 3. | In Accrual Frequency, select Holiday. The Scheduled Holidays panel displays. |
| 4. | Complete the following: |
|
Field |
Description |
|---|---|
|
Look Ahead Days |
Enter the number of days to look ahead for holiday-based accrual. This acts as an offset. For example, if the pay period start and end dates are June 1 and June 15, and the Look Ahead Days is 7, the system checks for holidays between June 8 and June 22. |
|
Holiday |
Click Holiday and select one or more holidays from the list, then click Accept. The Holiday Name displays. |
| 5. | Click Save. |
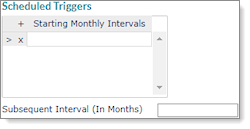
Defining Intervals That Trigger an Accrual
To define intervals (in months) that trigger an accrual, use the Scheduled Triggers panel.
To define an interval:
| 1. | Click the Client menu. |
| 2. | From Client|Change, select Time Off Accrual Schedules. |
| 3. | In Plan Year Based On, select Anniversary. In Accrual Frequency, select Scheduled. The Scheduled Triggers panel displays. |
| 4. | Complete the following: |
|
Field |
Description |
|---|---|
|
Starting Monthly Intervals |
Enter the number of months during an employee’s first year of employment when paid time off hours accrue. The last interval in the list should be 12. |
|
Subsequent Interval (In Months) |
Define the regular interval (in months) when hours accrue after an employee’s first year. |
| 5. | Click Save. |
Using Customized Accrual Subroutines
If the client uses an accrual method that differs from methods previously described, use a customized accrual subroutine.
Note: Contact a systems professional to design a subroutine using the parameters described here.
To design a subroutine:
| 1. | Click the Client menu. |
| 2. | From Client|Change, select Time Off Accrual Schedules. |
| 3. | In Accrual Frequency, select Custom Basic Routine. The Custom Basic Subroutines panel displays. |

| 4. | In Trigger Subroutine, enter a custom accrual frequency subroutine to determine whether hours should accrue for each employee. The format is: |
|
SUBROUTINE SUBR.NAME(ABSENCE.REGISTER.REC,EMPLOYEE.SSN,ACCRUAL.TRIGGERED) |
|---|
| The variable ACCRUAL.TRIGGERED should return either a 0 (zero) or 1 (one). If the value returned is 1, the system calculates an accrual. |
| 5. | In Calculation Subroutine, enter a customized subroutine to replace the standard daily accrual calculation. The subroutine must have the following parameter list: |
|
SUBROUTINE SUBR.NAME(COMPANY.NO,EMP.SSN,REG.TYPE,ABSENCE.REGISTER.REC, BENEFIT.PLAN.REC,VOUCHER.REC,HOURS.ACCRUED) |
|---|
|
The hours accrued should be returned in the variable HOURS.ACCRUED. The calling program does not accept the return of a negative number. If the system returns a negative number, it is set to zero instead. Do not return a number with an embedded decimal point because it will be truncated. |
| 6. | Click Save. |
