Working with PEO Client Accounting
You can define the accounts that PrismHR uses to build the client accounting download file and the report that breaks out invoice numbers using the client's own account numbers. To do this, enable the settings on the PEO Client Accounting form using the following instructions.
Note: If you are building onto a global template, enter only differences or additions. The system uses the data from the global template for any field you leave blank.
Establishing the General Ledger Chart of Accounts
Use the PEO Client Accounting panel to establish the general ledger Chart of Accounts and various accounting system parameters used for this client.
To establish the general ledger Chart of Accounts:
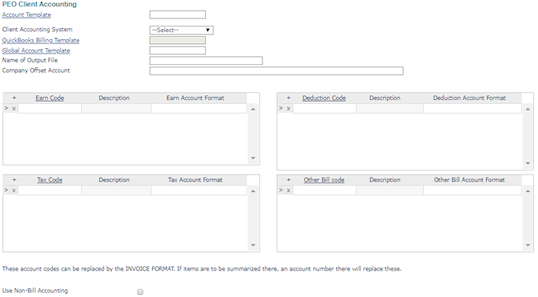
| 1. | Go to the PEO Client Accounting form and complete the following fields: |
| Field | Description | ||||||||||||
|---|---|---|---|---|---|---|---|---|---|---|---|---|---|
| Account Template | Enter the client's Account Template ID. | ||||||||||||
| Client Accounting System | Select the Client Accounting System type. | ||||||||||||
| QuickBooks Billing Template |
If you have been instructed to do so by the PrismHR Customer Support Team, enter the QuickBooks Billing Template used for billing export. The QuickBooks Billing Template field is for Quick Book Extracts custom logic implementation. The system uses this instead of the Accounting Template. Use this field. |
||||||||||||
| Global Account Template | Enter the Global Account Template used for this client. | ||||||||||||
| Name of Output File |
Enter the Name of Output File to specify the name of the file that the system creates for the client accounting download, if any. If you define an output file, PrismHR creates the file automatically during payroll processing and users can download it from the Payroll Reports form or the Payroll Summary form. Note: Do not use the following invalid characters when naming the output file: “*/:<>?\|. Instead, you can use uppercase A-Z, lowercase a-z, and a space. |
||||||||||||
| Company Offset Account | Enter the Company Offset Account number used to handle the accounting offset for this client. | ||||||||||||
| Earn Code/Earn Account Format |
For each pay code that should use a different format:
|
||||||||||||
| Tax Code/Tax Account Format |
For each tax account that should use a different format:
Enter the full code or the tax identifier, which is the part after the dash. The state/county/local segments of the number precedes the dash. The first two numbers after the dash indicate the kind of tax. Refer to your documentation or voucher data to determine what codes to use. The Select Tax Code form displays when you click this field, where you can select from a list of available tax deduction codes. This form displays the tax code's description and employer paid tax deduction.
|
||||||||||||
| Deduction Code/Deduction Account Format |
For each deduction code that should use a different format:
Note the following when working with deduction codes:
|
||||||||||||
| Other Bill Code/Other Bill Account Format |
For each bill code that should use a different format:
To set up an offset for a billing code that is set to Memo Client Acct Only, enter MEMO-OFFSET in the Other Bill Code field.
|
||||||||||||
| Use Non-Bill Accounting | Select Use Non-Bill Accounting to open the Non-Bill Accounting panel. |
| 2. | Click Save. |
Establishing Accounting System Parameters
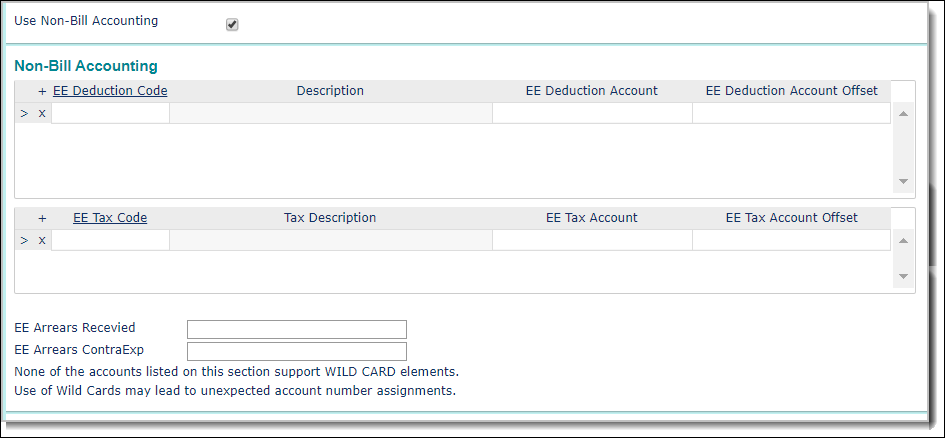
Use the Non-Bill Accounting panel, if you need to establish any accounting system parameters used for this company in PrismHR.
Note: This panel displays only if you select the Use Non-Bill Accounting option.
To establish any accounting system parameters:
| 1. | In the Non-Bill Accounting panel, complete the following fields: |
| Field | Description | |||||||||||||||
|---|---|---|---|---|---|---|---|---|---|---|---|---|---|---|---|---|
| EE Deduction Code/EE Deduction Amount/EE Deduction Account Offset |
For each employee deduction code:
Note the following when working with EE deduction codes:
|
|||||||||||||||
| EE Tax Code/EE Tax Account/EE Tax Account Offset |
For each employee tax code:
You can enter the full code or the tax identifier, which is the part after the dash. The state/county/local segments of the number precedes the dash. The first two numbers after the dash indicate the kind of tax. Refer to your documentation or voucher data to determine what codes to use.
Note: You must enter a value in this field. Otherwise, a warning displays since not entering this value could cause a payroll failure.
|
|||||||||||||||
| EE Arrears Recv | Enter the account number for the receivables portion of employee arrears in the EE Arrears Recv field. | |||||||||||||||
| EE Arrears ContraExpense | Enter the ContraExpense account number for the receivables portion of employee arrears in the EE Arrears ContraExpense field. |
| 2. | Click Save. |
Defining the Custom Layout
If you selected Custom as the Client Accounting System, the Custom Layout panel displays.

| 1. | In the Custom Layout panel, complete the following fields: |
| Field | Description | ||||||
|---|---|---|---|---|---|---|---|
|
Cust Column |
Enter the Cust Column number where the data is entered. If you enter the same column number in multiple rows, the system concatenates the data. |
||||||
| Cust Heading | In the Cust Heading, enter the heading to display in the first row. | ||||||
|
Data |
Click Data to display the Lookup Items panel, where you can select a preset code to display in the spreadsheet. (Only the preset code displays in the spreadsheet, not the description.) You can also enter data in this field instead of selecting an item from the Lookup Items list. Note the following:
|
||||||
|
Mask |
Enter the Mask code to use on the data, if any. |
||||||
|
Delimiter |
Select the Delimiter for the file, either tab or comma. |
||||||
| Show Heading | Select Show Heading to include the heading row in the file. |
| 2. | Click Save. |
