Using the Notification Control Panel (Onboarding)
Use the OB Notify section in the Notification Control Panel to:
| • | Start and stop the notification engine during onboarding |
| • | Determine the frequency at which the notifications engine sends notifications |
During onboarding, the system sends event and time-based notifications attached to the workflows to notification recipients. The system:
| • | Sends time-based notifications daily, typically shortly after midnight. This applies only to incomplete forms in the onboarding workflow. |
| • | Sends event-based notifications when the event specified by the trigger condition occurs (for example, when the employee completes the workflow). The notification engine runs in the background and periodically checks to see whether there are notifications to send. If so, it sends event-based notifications when they turn up during the check. |
Note: The options in the BE Notify section are only used in Benefits Enrollment and do not affect Onboarding.
To check for and send available event-based notifications:
| 1. | Click Back Office. |
| 2. | From Operations|Action select Notification Control Panel. The Notification Control Panel form opens. |
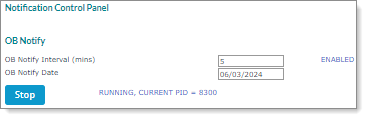
| 3. | In OB Notify Interval (mins), enter the number of minutes. You can enter values from 5 to 1440 minutes. |
Note: The state of the process, ENABLED or DISABLED, displays next to the OB Notify Interval (mins) field.
OB Notify Date populates automatically with the date the system last sent time-based notifications.
If you need to manually resend a notification (for example, if employees did not receive the notification, or if there is a change to the notification template), you can delete the displayed OB Notify Date, and click Save. The system resends time-based notifications for that day with the current date. When the notifications are resent, the current date displays.
| 4. | To submit your settings and start the notifications engine, click Save. |
| Click this in the OB Notify section | To do this |
|---|---|
| Stop |
Stop the system from sending notifications — Stop changes to Start, and the status changes to NOT RUNNING. The request to stop notifications takes effect immediately. However, it can take a few minutes for the updated status to display correctly. Note: The status displays next to the Stop button. |
| Start |
Start the notifications engine without changing settings — Start changes to Stop, and the status changes to RUNNING. If you stop and then restart the notifications engine, the process ID (PID) number resets and a new PID displays. Note: The status displays next to the Start button. |
| Cancel | Close without saving changes. |
