Adding Anytime Benefits to Employee Portal
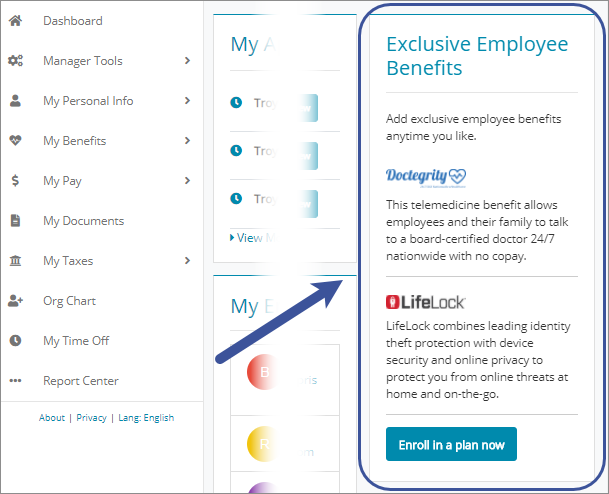
Integrating access to Anytime Benefits in Employee Portal (EP) enables employees to access exclusive benefit plans directly from the EP Dashboard.
Note: Employees can enroll in Anytime Benefits at any point during a plan year. A date or event does not trigger the Anytime Enrollment process — you can enroll in Anytime Benefits at any time. For detailed information on this process, see the Setting Up Anytime Enrollment chapter in the Benefits Enrollment Guide.
What you Need
Before you begin, you must have:
| • | Benefits Enrollment enabled for the clients using the template |
| • | An active Anytime Enrollment workflow with Anytime Benefits set up for the clients using the template |
Creating the SSO Service
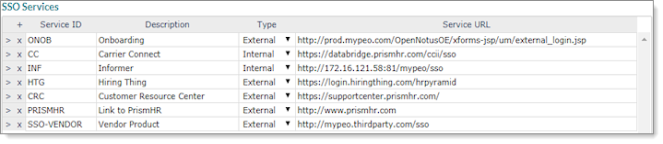
To access Benefits Enrollment from the Anytime Benefits widget on the EP Dashboard, you must create the SSO service in PrismHR.
To create the SSO service in PrismHR:
| 1. | Click |
| 2. | From System|Change select System Parameters. The System Parameters form opens. |
| 3. | Click the Actions menu |
| 4. | Click + to add a new row. |
| 5. | Complete the following: |
|
Use this option... |
To define this... |
|---|---|
|
Service ID |
BE_ANYTIME |
|
Description |
SSO link to Benefits Enrollment. |
|
Type |
External |
|
Service Destination |
Outbound |
|
Service URL |
https://nnn-ep.prismhr.com/phr/ess/nnn/sso/benefitEnrollment Replace both instances of nnn with your three‑letter designator. For example, if your designator is abc, the SSO URL would be: https://abc-ep.prismhr.com/phr/ess/abc/sso/benefitEnrollment. |
| 6. | Click Save. |
After saving, the SSO service is ready to use in the Anytime Benefits widgets.
Creating the Anytime Benefits Widget
The following details adding the Anytime Benefits widget to a template on the Employee Experience Configuration form in PrismHR. You may want to create a new template for all clients set up with Anytime Benefits, but you can also add the widget to an existing template. You can also use a client override to enable the widget for specific clients.
To create the Anytime Benefits widget:
| 7. | Click Configuration Templates. The Configuration Templates form opens. |
| 8. | On the template to add the widget, click |
| 9. | On the Dashboard tab, click |
| 10. | Complete the following: |
|
Use this option... |
To define this... |
|---|---|
|
Title |
Example text includes, "Exclusive Employee Benefits!" |
|
Markdown |
Example markdown syntax: <p style="color:#333; padding: 5px 0 10px 0;">Add exclusive employee benefits anytime you like. </p> <!--- The next two lines are for Doctegrity. Remove them if you are not offering this option --> <img src="https://www.prismhr.com/wp-content/uploads/2020/04/Doctegrity-Logo-Transparent-600x147.png" alt="Pet Insurance" width="100" style="padding-top: 5px;"> <p style="color:#333; border-bottom: 1px solid #ccc; padding: 10px 0 15px 0;">This telemedicine benefit allows employees and their family to talk to a board-certified doctor 24/7 nationwide with no copay.</p> <!--- The next two lines are for LifeLock Identity Protection. Remove them if you are not offering this option --> <img src="https://www.prismhr.com/wp-content/uploads/2019/05/EB-Portal-Enrollment-Website_for-PrismHR-002.jpg" alt="Lifelock Logo" width="100" style="padding-top: 5px;"> <p style="color:#333; border-bottom: 1px solid #ccc; padding: 10px 0 15px 0;">LifeLock combines leading identity theft protection with device security and online privacy to protect you from online threats at home and on-the-go.</p> <!--- The next line provides a link to benefit enrollment where the employee can enroll. There is no need to edit them --> <p style="margin-top: 26px;"><a href="{{ssoId.BE_ANYTIME}}" target="_blank" style="color: #ffffff; background-color: #008aad; cursor: pointer; border-radius: 4px; border: none; padding: 12px 16px 12px 16px; font-weight: bold;">Enroll in a plan now</a></p> |
|
Icon |
The icon associated with the widget. |
| • | To move the widget in the list, click |
| • | To show or hide the widget, click |
| • | To preview, click |
| 11. | Click Save. |
After saving the template, all clients using the template can access their Anytime Benefits from the EP Dashbaord.
